Getting Started
Caution
本章内容已过时,请结合 Example 和源码来了解
Warning
注意:
当前本章内容非常不完善,结构不清晰、内容不完整,目前建议结合 Example 和源码来了解。
在 Ranim 中,定义并渲染一段动画的代码基本长成下面这个样子:
#![allow(unused)]
fn main() {
#[scene]
#[output]
fn scene_name(r: &mut RanimScene) {
    let _r_cam = r.insert_and_show(CameraFrame::default());

    let r_square = r.insert(square);
    r.timeline_mut(&r_square)
        .play_with(|square| square.fade_in())
        .forward(0.5);
    // ...
}
}
形如 fn(&mut RanimScene) 的函数被称为场景函数,在其中可以通过 RanimScene 这个核心结构来对时间线进行操作以编码动画。
上面的例子中涉及了一些宏:
#[scene]:为场景函数生成一个对应的static <scene_name>_scene: &'static Scene,包含了场景名称、函数指针、场景设置、输出设置(通过#[output]来设置)等信息。 可以配置一些属性:#[scene(name = "...")]:为场景指定一个名称,默认与函数名相同。#[scene(clear_color = "#ffffffff")]:为场景指定一个清除颜色,默认值为#333333ff。#[output]:为场景添加一个输出: 输出的文件名<output_name>会被命名为<scene_name>_<width>x<height>_<frame_rate>。#[output(dir = "...")]:设置相对于./output的输出目录,也可以是绝对路径#[output(pixel_size = (1920, 1080))]:设置输出像素大小#[output(frame_rate = 60)]:设置输出帧率#[output(save_frames = true)]:设置是否保存每一帧(保存在<dir>/<output_name>-frames/下)
#[wasm_demo_doc]:为场景指定一个文档字符串,默认值为空字符串。
使用 ranim-cli 可以方便的对场景进行预览、渲染:
Important
注意:
如果想要使用 ranim-cli,需要为
crate-type添加dylib。
-
ranim preview:调用 Cargo 构建指定的 target,然后启动一个预览应用加载编译出的 dylib,并监听改动进行重载。ranim preview # 预览根 package 的 lib target ranim preview -p package_name # 预览 package_name 包的 lib target ranim preview -p package_name --example example_name # 预览 package_name 包的 example_name 示例 -
ranim render:调用 Cargo 构建指定的 target,然后启动一个渲染应用加载编译出的 dylib,并渲染动画。ranim render # 渲染根 package 的全部场景的所有输出 ranim render scene_name # 渲染根 package 中名称为 scene_name 的场景的所有输出 ranim render -p package_name # 渲染 package_name 包的全部场景的所有输出 ranim render -p package_name --example example_name # 渲染 package_name 包的 example_name 示例中的全部场景的所有输出
此外,ranim 还提供了一些 api 来直接渲染或预览场景。
render_scene(hello_ranim_scene);
preview_scene(hello_ranim_scene); // 需要 `app` feature
1. 场景的构造
任何实现了 SceneConstructor Trait 的类型都可以被用于构造场景:
/// A scene constructor
///
/// It can be a simple fn pointer of `fn(&mut RanimScene)`,
/// or any type implements `Fn(&mut RanimScene) + Send + Sync`.
pub trait SceneConstructor: Send + Sync {
    /// The construct logic
    fn construct(&self, r: &mut RanimScene);

    /// Use the constructor to build a [`SealedRanimScene`]
    fn build_scene(&self) -> SealedRanimScene {
        let mut scene = RanimScene::new();
        self.construct(&mut scene);
        scene.seal()
    }
}
ranim 自动为 F: Fn(&mut RanimScene) + Send + Sync 实现了该 Trait。
也就是说,对于要求 impl SceneConstructor 的参数:
- 既可以传入函数指针
fn(&mut RanimScene) - 也可以传入一个闭包
|r: &mut RanimScene| { /*...*/ }。
整个构造过程围绕着 &mut RanimScene,它是 ranim 中编码动画 api 的主入口。
2. 时间线
每一条被插入到场景中的时间线都有一个唯一的 TimelineId。
时间线是一种用于编码物件动画的结构,它的内部有一个存储了动画以及展示时间的列表,以及用于编码静态动画的物件状态。
编码动画的过程本质上是在向时间线中插入动态或静态的动画:
2.1 插入物件(创建时间线)
使用 r.new_timeline() 可以插入一条空白的时间线:
let tid: TimelineId = r.new_timeline();// TODO: 后面还没更新
通过 r.insert(state) 可以插入一个物件并为其创建一条时间线:
let square = Square::new(2.0).with(|x| {
    x.set_color(manim::BLUE_C);
});
let circle = Circle::new(1.0).with(|x| {
    x.set_color(manim::RED_C);
});

let r_square1 = r.insert(square.clone());
let r_square2 = r.insert(square);
let r_circle = r.insert(circle);
2.1 访问时间线
时间线在被创建之后,需要通过 r.timeline(&index) 或 r.timeline_mut(&index) 来访问:
{
    // 类型为 `&ItemTimeline<Square>`
    let square_timeline_ref = r.timeline(&r_square1);
}
{
    // 类型为 `&ItemTimeline<Circle>`
    let circle_timeline_ref = r.timeline(&r_circle);
}
除了通过单一的 &ItemId 来访问单一的时间线,也可以通过 &[&ItemId<T>; N] 来访问多条时间线:
// 类型为 `[&mut ItemTimeline<Square>]`
let [sq1_timeline_ref, sq2_timeline_ref] = r.timeline_ref(&[&r_square1, &r_square2]);
同时也可以访问全部时间线的切片的不可变/可变引用,不过元素是类型擦除后的 ItemDynTimelines:
// 类型为 &[ItemDynTimelines]
let timelines = r.timelines();
// 类型为 &mut [ItemDynTimelines]
let timelines = r.timelines_mut();
2.2 操作时间线
ItemTimeline<T> 和 ItemDynTimelines 都具有一些用于编码动画的操作方法:
| 方法 | ItemTimeline<T> | ItemDynTimelines | 描述 |
|---|---|---|---|
show / hide | ✅ | ✅ | 显示/隐藏时间线中的物体 |
forward / forward_to | ✅ | ✅ | 推进时间线 |
play / play_with | ✅ | ❌ | 向时间线中插入动画 |
update / update_with | ✅ | ❌ | 更新时间线中物体状态 |
state | ✅ | ❌ | 获取时间线中物体状态 |
有关方法的具体详细定义可以参考 API 文档。
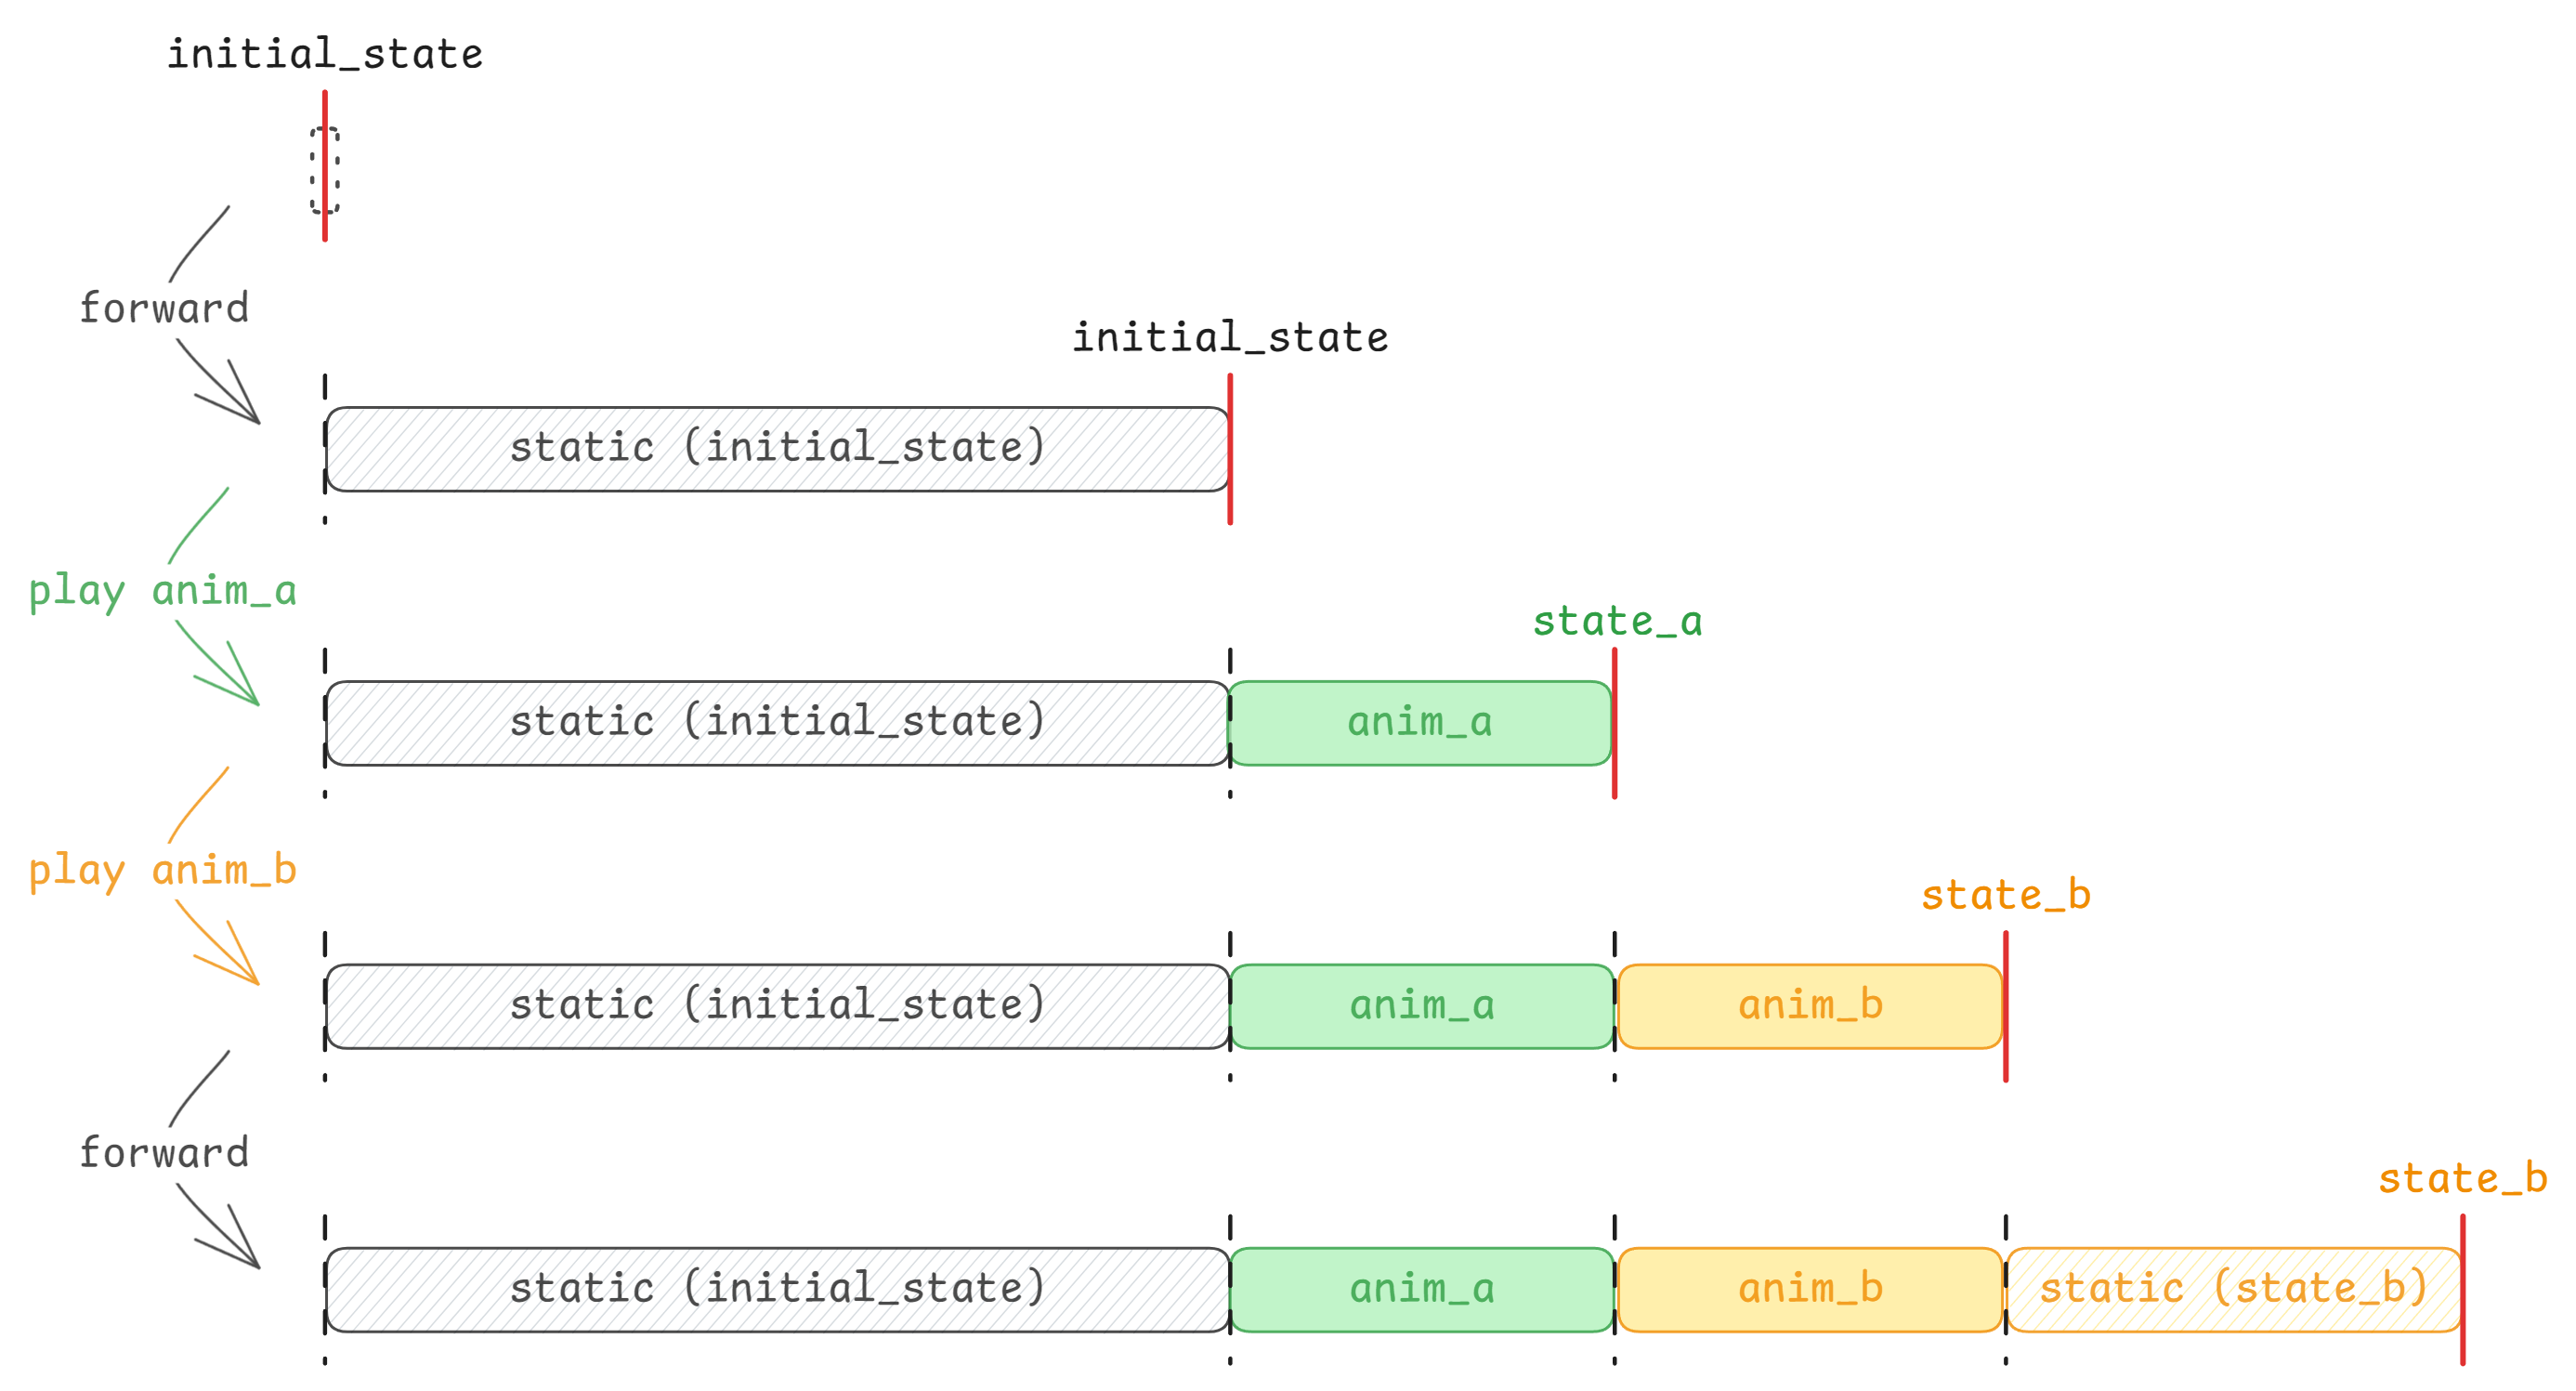
下面的例子使用一个 Square 物件创建了一个时间线,然后编码了淡入 1 秒、显示 0.5 秒、消失 0.5 秒、显示 0.5 秒、淡出 1 秒的动画:
use ranim::{
    anims::fading::FadingAnim, color::palettes::manim, items::vitem::geometry::Square, prelude::*,
};

#[scene]
#[output(dir = "getting_started0")]
fn getting_started0(r: &mut RanimScene) {
    // Equivalent to creating a new timeline then playing `CameraFrame::default().show()` on it
    let _r_cam = r.insert(CameraFrame::default());
    // A Square with size 2.0 and color blue
    let square = Square::new(2.0).with(|square| {
        square.set_color(manim::BLUE_C);
    });

    let r_square = r.new_timeline();
    {
        let timeline = r.timeline_mut(r_square);
        timeline
            .play(square.clone().fade_in()) // Can be written as `square.fade_in_ref()`
            .forward(1.0)
            .hide()
            .forward(1.0)
            .show()
            .forward(1.0)
            .play(square.clone().fade_out()); // Can be written as `square.fade_out_ref()`
    }
    // In the end, ranim will automatically sync all timelines and forward to the end.
    // Equivalent to `r.timelines_mut().sync();`
}
2.3 转换时间线类型
在对一个物件进行动画编码的过程中有时会涉及物件类型的转换,比如一个 Square 物件需要被转换为更低级的 VItem 才能够被应用 Write 和 UnWrite 动画,
此时就需要对时间线类型进行转换:
use ranim::{
    anims::{creation::WritingAnim, transform::TransformAnim},
    color::palettes::manim,
    items::vitem::{
        VItem,
        geometry::{Circle, Square},
    },
    prelude::*,
};

#[scene]
#[output(dir = "getting_started1")]
fn getting_started1(r: &mut RanimScene) {
    let _r_cam = r.insert(CameraFrame::default());
    // A Square with size 2.0 and color blue
    let square = Square::new(2.0).with(|square| {
        square.set_color(manim::BLUE_C);
    });

    let circle = Circle::new(2.0).with(|circle| {
        circle.set_color(manim::RED_C);
    });

    let r_vitem = r.new_timeline();
    {
        let timeline = r.timeline_mut(r_vitem);
        // In order to do more low-level opeerations,
        // sometimes we need to convert the item to a low-level item.
        timeline.play(VItem::from(square).transform_to(VItem::from(circle.clone())));
        timeline.play(VItem::from(circle).unwrite());
    }
}
Ranim Cli
使用 Ranim Cli 可以更方便地进行场景地预览、输出属性等的定义:
#[scene]
#[output]
pub fn scene_constructor1(r: &mut RanimScene) {
    // ...
}

#[scene(clear_color = "#000000", name = "custom")]
#[output(width = 1920, height = 1080, frame_rate = 60, save_frames = false, dir = "output")]
pub fn scene_constructor2(r: &mut RanimScene) {
    // ...
}
同时,不必再编写 main.rs 来手动调用渲染或预览 api,直接通过 cli 命令即可完成场景的预览或渲染(而且预览支持热重载):
ranim preview:调用 Cargo 构建指定的 lib,然后启动一个预览应用加载编译出的 dylib,并监听改动进行重载。ranim render:调用 Cargo 构建指定的 lib,然后加载它并渲染动画。
但是,要注意为你的 lib 添加 crate-type = ["dylib"] 来使得它能被编译为动态库。
核心概念
动画
本节将对 Ranim 中 动画 的实现思路进行讲解。
Eval<T> Trait
一个标准化的动画其实本质上就是一个函数 ,它的输入是一个进度值 ,输出是该动画在对应进度处的结果 :
这个函数 不仅定义了动画的 求值,同时其内部也包含了求值所需要的 信息。对应到计算机世界,其实也就是 算法 和 数据,而对应到编程语言上也就是 方法 和 数据类型。
在由 Rust 实现的 Ranim 中也就是 Eval<T> Trait 和实现了它的类型 T:
/// This is the core of any animation, an animation is basically a function on time.
///
/// This represents a normalized animation function for type `T`, which accepts
/// a progress value `alpha` in range [0, 1] and returns the evaluation result in type `T`.
pub trait Eval<T> {
    /// Evaluates at the given progress value `alpha` in range [0, 1].
    fn eval_alpha(&self, alpha: f64) -> T;

    // ...
}
它接受自身的不可变引用和一个进度值作为输入,经过计算,输出一个自身类型的结果。
例 | Static 动画
ranim_core::animation::Static 动画是最基础的,也是唯一一个内置进 ranim-core 的动画:
/// A static animation.
pub struct Static<T>(pub T);

impl<T: Clone> Eval<T> for Static<T> {
    fn eval_alpha(&self, _alpha: f64) -> T {
        self.0.clone()
    }
}
非常简单,其内置的 信息 就是物件本身,其 求值 就是简单的返回相同的物件。
例 | Transform 动画
以 ranim_anims::transform::Transform 动画为例,其内部包含了物件初始状态和目标状态,以及用于插值的对齐后的初始和目标状态,在 EvalDynamic<T> 的实现中使用内部的数据进行计算求值得到结果:
/// Transform Anim
pub struct Transform<T: TransformRequirement> {
    src: T,
    dst: T,
    aligned_src: T,
    aligned_dst: T,
}

impl<T: TransformRequirement> Eval<T> for Transform<T> {
    fn eval_alpha(&self, alpha: f64) -> T {
        if alpha == 0.0 {
            self.src.clone()
        } else if 0.0 < alpha && alpha < 1.0 {
            self.aligned_src.lerp(&self.aligned_dst, alpha)
        } else if alpha == 1.0 {
            self.dst.clone()
        } else {
            unreachable!()
        }
    }
}
AnimationCell
一个动画还会有很多额外的信息:
- 开始时间
- 持续时间
- 速率函数
- …
在 Ranim 中,这些被信息被表示为一个 AnimationInfo 结构:
/// Info of an animation.
///
/// When [`AnimationInfo::enabled`] is `false`, the animation will not be evaluated.
#[derive(Debug, Clone)]
pub struct AnimationInfo {
    /// The rate function used for evaluating, default value: [`linear`]
    pub rate_func: fn(f64) -> f64,
    /// Start sec, default value: 0.0
    pub start_sec: f64,
    /// The duration seconds, default value: 1.0
    pub duration_secs: f64,
    /// Is enabled, default value: true
    pub enabled: bool,
}

impl Default for AnimationInfo {
    fn default() -> Self {
        Self {
            rate_func: linear,
            start_sec: 0.0,
            duration_secs: 1.0,
            enabled: true,
        }
    }
}
通过这些信息,我们可以将全局的秒映射到局部的 ,并将局部的 映射到内部标准化的 :
impl AnimationInfo {
    /// Map the global sec to outer alpha
    ///
    /// note that this uses a range_inclusive
    pub fn map_sec_to_alpha(&self, sec: f64) -> Option<f64> {
        if self.range_inclusive().contains(&sec) {
            let alpha = (sec - self.start_sec) / self.duration_secs;
            let alpha = if alpha.is_nan() { 1.0 } else { alpha };
            Some(alpha)
        } else {
            None
        }
    }
    /// Map the outer alpha to inner alpha
    pub fn map_alpha(&self, alpha: f64) -> f64 {
        (self.rate_func)(alpha)
    }
    // ...
}
如此,将以 为输入标准化的动画函数与这些信息结合,也就构造除了一个以秒 为输入的动画函数 :
在 Ranim 中,这对应着 AnimationCell 结构:
/// A cell of an animation
pub struct AnimationCell<T> {
    inner: Box<dyn Eval<T>>,
    /// The animation info
    pub info: AnimationInfo,
// ...
}

impl<T> Eval<T> for AnimationCell<T> {
    fn eval_alpha(&self, alpha: f64) -> T {
        self.inner.eval_alpha(self.info.map_alpha(alpha))
    }
}
Requirement Trait 模式
相信你注意到了,在实际的动画编写中,我们并没有手动构造任何一个动画结构,而是直接在物件身上调用一个方法来构造 AnimationCell:
let vitem_a = // ...;
let vitem_b = // ...;

// let anim = Transform::new(vitem_a, vitem_b).to_animation_cell();
// r.timeline_mut(t_id).play(anim);

r.timeline_mut(t_id).play(vitem_a.clone().transform_to(vitem_b));
let mut vitem_a = // ...;
let vitem_b = // ...;
// let anim = Transform::new(vitem_a, vitem_b).to_animation_cell();
// vitem_a = anim.eval_alpha(1.0);
// r.timeline_mut(t_id).play(anim);
r.timeline_mut(t_id).play(vitem_a.transform_to(vitem_b));这是 Ranim 动画的一种编程模式,每一个动画都有一个对应的 Requirement Trait:
/// The requirement of [`Transform`]
pub trait TransformRequirement: Alignable + Interpolatable + Clone {}
impl<T: Alignable + Interpolatable + Clone> TransformRequirement for T {}
同时还有一个对应的 Animation Trait,包含了一系列的 Helper 函数,以及为 T: <Requirement Trait> 的实现:
/// The methods to create animations for `T` that satisfies [`TransformRequirement`]
pub trait TransformAnim: TransformRequirement + Sized + 'static {
    /// Create a [`Transform`] anim with a func.
    fn transform<F: Fn(&mut Self)>(&mut self, f: F) -> AnimationCell<Self>;
    /// Create a [`Transform`] anim from src.
    fn transform_from(&mut self, src: Self) -> AnimationCell<Self>;
    /// Create a [`Transform`] anim to dst.
    fn transform_to(&mut self, dst: Self) -> AnimationCell<Self>;
}

impl<T: TransformRequirement + 'static> TransformAnim for T {
    fn transform<F: Fn(&mut T)>(&mut self, f: F) -> AnimationCell<T> {
        let mut dst = self.clone();
        (f)(&mut dst);
        Transform::new(self.clone(), dst)
            .into_animation_cell()
            .with_rate_func(smooth)
            .apply_to(self)
    }
    fn transform_from(&mut self, s: T) -> AnimationCell<T> {
        Transform::new(s, self.clone())
            .into_animation_cell()
            .with_rate_func(smooth)
            .apply_to(self)
    }
    fn transform_to(&mut self, d: T) -> AnimationCell<T> {
        Transform::new(self.clone(), d)
            .into_animation_cell()
            .with_rate_func(smooth)
            .apply_to(self)
    }
}
通过这种模式可以便捷地构造动画,并将动画的效果应用到物件状态上。
时间线
简单来说,时间线的本质是类型擦除后的 AnimationCell<T> 的容器,若干条时间线组合在一起即表示了整个场景的完整动画。
因为 AnimationCell<T> 带有范性参数,所以也就涉及类型擦除,满足于 T: AnyExtractCoreItem 的 AnimationCell<T> 会被擦除为 Box<dyn CoreItemAnimation>:
impl<T: AnyExtractCoreItem> CoreItemAnimation for AnimationCell<T> {
    fn eval_alpha_dyn(&self, alpha: f64) -> DynItem {
        DynItem(Box::new(self.eval_alpha(alpha)))
    }
    fn eval_alpha_core_item(&self, alpha: f64) -> Vec<CoreItem> {
        self.eval_alpha(alpha).extract()
    }
    // ...
}
/// A timeline for a animations.
#[derive(Default)]
pub struct Timeline {
anims: Vec<Box<dyn CoreItemAnimation>>,
// Followings are states use while constructing
cur_sec: f64,
/// The start time of the planning static anim.
/// When it is some, it means that it is showing and has a planning static anim.
planning_static_start_sec: Option<f64>,
}在编写动画时的一系列操作(如 forward、play 等)最后都会转变为对 Timeline 内部属性的操作,最终达成的结果就是在其 anims 属性中完成此条时间线所有动 AnimationCell 的编码(即“把动画在时间上放到正确的位置”)。