跳转至

博客

『Python基础』2. 基础数据类型与运算

一、Python解释器的交互模式

python 在命令行中有很多种使用方式,最基本的就是通过 python 文件名.py 来执行脚本,在 起步 一篇中我们还以仅仅一个 python 的方式使用过,结果是出现了这些输出:

Bash Session
1
2
3
4
PS C:\Users\xiaob> python
Python 3.11.2 (tags/v3.11.2:878ead1, Feb  7 2023, 16:38:35) [MSC v.1934 64 bit (AMD64)] on win32
Type "help", "copyright", "credits" or "license" for more information.
>>>

这其实就是进入了 Python解释器的 交互模式

退出方式为按 Ctrl + Z 或输入 exit() 后按回车。

你输入的每一行都会被作为 Python语句解析、执行,并将语句返回的结果显示出来。

比如我们输入 2 + 2,这个语句被执行后返回的结果便是 4

Bash Session
>>> 2 + 2
4

再比如我们输入 print('yeah'),这个语句没有返回值,但是在执行过程中会打印 Yeah

Bash Session
>>> print('Yeah')
Yeah

交互模式中 也可以进行变量的声明与访问,也就是说它是“有记忆性的”:

Bash Session
1
2
3
4
5
6
>>> x = input("What's your name?")
What's your name?AzurIce
>>> x
'AzurIce'
>>> print("HelloWorld, " + x + "!")
HelloWorld, AzurIce!

第二行中 What's your name?input 语句的输出,AzurIce 来自我键盘的输入。

这便使得在学习 Python 的过程中做一些尝试是十分简单的。

二、基础数据类型与运算

Python 种有如下4种基础数据类型:

类型 名称 描述
int Integer 整型 存储整数
float Floating Point Number 浮点型(双精度) 存储小数
complex Complex 复数型 存储复数(表示方法例如3 + 2j
str String 字符串 存储字符串
bool Boolean 布尔型 存储True或False

Python 有一个内置函数 type(),它可以返回传入参数的类型:

Bash Session
>>> type(9)
<class 'int'>
>>> type(9.99)
<class 'float'>
>>> type('??')
<class 'str'>
>>> type(True)
<class 'bool'>
>>> type(2.3+2j)
<class 'complex'>

下面详细介绍一下 int、float 和 str 以及相关运算,其他的自行查阅文档。

1. int、float

算数运算:

  • 一元:+-表示正负

  • 二元:

  • +, -, *, / 加 减 乘 除
  • // 整除
  • % 取余(取模)
  • ** 乘方

比如我们在交互模式中输入一些仅由数值运算组成的语句:

Bash Session
>>> 2 + 2
4
>>> 50 - 5*6
20
>>> (50 - 5*6) / 7
2.857142857142857
>>> 8 // 5
1
>>> 8 % 5
3
>>> 2**10
1024

2. str

字符串使用 '" 包裹,也可以使用 """''' 跨越多个行:

Bash Session
1
2
3
4
5
6
7
8
>>> print('spam eggs')  # single quotes
spam eggs
>>> print('doesn\'t')  # use \' to escape the single quote...
doesn't
>>> print("doesn't")  # ...or use double quotes instead
doesn't
>>> print('"Yes," they said.')
"Yes," they said.

字符串之间可以使用 + 连接:

Bash Session
>>> print('A' + 'B')
AB

也可以使用 * 来重复整个序列:

Bash Session
>>> print('NB' * 6)
NBNBNBNBNBNB

其实这是序列的特性,对应的还有下标访问,将在后续文章中讲到 List 时讲解

原始字符串

如果不希望前置 \ 的字符转义成特殊字符,可以使用 原始字符串,在引号前添加 r 即可:

Bash Session
1
2
3
4
5
>>> print('C:\some\name')  # here \n means newline!
C:\some
ame
>>> print(r'C:\some\name')  # note the r before the quote
C:\some\name
多行字符串

字符串字面值可以包含多行。 一种实现方式是使用三重引号:"""..."""'''...'''。 字符串中将自动包括行结束符,但也可以在换行的地方添加一个 \ 来不包括此次换行:

Bash Session
1
2
3
4
5
6
7
8
>>> print("""\
Usage: thingy [OPTIONS]
     -h                        Display this usage message
     -H hostname               Hostname to connect to
""")
Usage: thingy [OPTIONS]
     -h                        Display this usage message
     -H hostname               Hostname to connect to

3. bool

比较运算:

  • ><>=<===!= 大于 小于 大于等于 小于等于 等于 不等于

布尔运算:

  • not 非:若 expression 为真,则 not expression 为假,若为假,则为真。

  • and 与:expression1 and expression2 只有都为真才是真,其他情况为假

  • or 或:有一者为真则为真,都为假才是假。

计算机中常用 布尔值 表示 满足不满足,满足为 True(真),不满足为 False(假)。

三、 类型转换

1. 隐式

Bash Session
1
2
3
4
5
6
7
8
>>> type(9 + 9.99)
<class 'float'>
>>> type(9 * 9.99)
<class 'float'>
>>> type(9 / 8)
<class 'float'>
>>> type(9.9 // 8)
<class 'float'>

但是数字与字符串之间无法进行加法运算,不会进行隐式类型转换:

Bash Session
1
2
3
4
>>> type('9' + 9)
Traceback (most recent call last):
  File "<stdin>", line 1, in <module>
TypeError: can only concatenate str (not "int") to str

2. 显式

Python
类型名() # 将 值 转换为 类型名 类型

转换为 int 类型:

Bash Session
>>> int(True)
1
>>> int(False)
0
>>> int(9.8)
9
>>> int("98")
98
>>> int("9.8")
Traceback (most recent call last):
  File "<stdin>", line 1, in <module>
ValueError: invalid literal for int() with base 10: '9.8'

转换为 float 类型:

Bash Session
>>> float(True)
1.0
>>> float(False)
0.0
>>> float(9.8)
9.8
>>> float("98")
98.0
>>> float("9.8")
9.8

转换为 str 类型:

Bash Session
1
2
3
4
5
6
7
8
>>> str(True)
'True'
>>> str(False)
'False'
>>> str(9.8)
'9.8'
>>> str(9)
'9'

转换为 bool 类型:

Bash Session
>>> bool(9.8)
True
>>> bool(0.0)
False
>>> bool(0)
False
>>> bool(-1)
True
>>> bool("9.8")
True
>>> bool("0")
True
>>> bool("")
False

对于字符串,非空即为 True

对于数字,非 0 即为 True

『Python基础』3. 变量

一、概述

变量,顾名思义,可以改变的量。像是挖了个槽,给它起个名,然后可以把各种值塞到这个槽里。

把值塞到这个槽里的行为叫做 赋值,使用 = 来执行,它会把右侧的表达式的结果赋给左侧的变量。

例:

Python
name = 'AzurIce' # 将 'AzurIce' 这个值赋给 name变量
print(f'My mame is {name}')

输出:

My Name is AzurIce

Python
1
2
3
4
name = 'Asurx' # 将 'Asurx' 这个值赋给 name变量
print(f'My mame is {name}')
name = 'AzurIce' # 将 'AzurIce' 这个值赋给 name变量
print(f'Now my mame is {name}')

输出:

My name is Asurx

Now my name is AzurIce

二、存储数据的类型

三、 类型转换

1. 隐式

Python
# int 与 float 做运算的结果为 float
# 除法运算的结果为 float
# 整除运算的结果为 int
print(type(9 + 9.99)) # 输出 <class 'float'>
print(type(9 * 9.99)) # 输出 <class 'float'>
print(type(9 / 8))    # 输出 <class 'float'>
print(type(9.9 // 8))    # 输出 <class 'float'>

# 不能自动转换
print(type('??' + 9)) # 报错

2. 显式

Python
类型名() # 将 值 转换为 类型名 类型
Python
1
2
3
4
5
print(int(True))  # 1
print(int(False)) # 0
print(int(9.8))   # 9
print(int("98"))  # 98
print(int("9.8")) # 报错
Python
1
2
3
4
5
print(float(True))  # 1.0
print(float(False)) # 0.0
print(float(9.8))   # 9.8
print(float("98"))  # 98.0
print(float("9.8")) # 9.8
Python
1
2
3
print(str(True))  # True
print(str(False)) # False
print(str(9.8))   # 9.8

其实直接用 print 打印时,就隐式的转换为了 str:

Python
print(True) # 相当于 print(str(True))
print(999)  # 相当于 print(str(999))

注意 bool:

Python
1
2
3
4
5
6
7
print(bool(9.8))   # True
print(bool(0.0))   # False
print(bool(0))     # False
print(bool(-1))     # True
print(bool("9.8")) # True
print(bool("0"))   # True
print(bool(""))    # False

对于字符串,非空即为 True

对于数字,非0即为 True

四、一些例子

1. 计算x的阶乘

Python
1
2
3
4
5
6
x = int(input())
ans = 1
while x:
    ans = ans * x
    x = x - 1;
print(ans)

2. 计算1到n的自然数平方和

Python
1
2
3
4
5
6
x = int(input())
ans = 0
while x:
    ans = ans + (x ** 2)
    x = x - 1;
print(ans)

『Python基础』4. 分支(if)与循环(while)

一、分支(if)

在程序中,经常会有做判断的需求,例如输入一个分数,来判断是否及格,这时候就需要使用 if 语句。

Python
1
2
3
if expression:
    something you want to do
    some other thing you want to do

expression 的值为 True 时,则会执行下方缩进一层级的代码。

当然还可以衔接 else,字面意思,值为 False 时执行。

Python
1
2
3
4
5
score = input("Please input youre score: ")
if score < 60:
    print("Fail")
else:
    print("Pass")

你会发现这段代码执行会有问题:

Text Only
1
2
3
4
Traceback (most recent call last):
  File "C:/Users/xiaob/Desktop/test.py", line 2, in <module>
    if score < 60:
TypeError: '<' not supported between instances of 'str' and 'int'

这是因为 input() 获取到的内容是 str(字符串)类型的,python把它当作若干个字符的序列,而非一个数字。使用 eval() 可以将字符串的内容当作 python表达式 并得到这个表达式的结果,即 eval('9 + 9 * 10') 的结果是数字类型的 99

Python
1
2
3
4
5
score = eval(input("Please input youre score: "))
if score < 60:
    print("Fail")
else:
    print("Pass")

如果你想要实现更多的分支可以使用 elif

Python
score = eval(input("Please input youre score: "))
if 90 <= score:
    print("A")
elif 85 <= score <= 89:
    print("A-")
elif 81 <= score <= 84:
    print("B+")
elif 78 <= score <= 80:
    print("B")
elif 75 <= score <= 77:
    print("B-")
elif 72 <= score <= 74:
    print("C+")
elif 68 <= score <= 71:
    print("C")
elif 65 <= score <= 67:
    print("C-")
elif 63 <= score <= 64:
    print("D+")
elif 61 <= score <= 62:
    print("D")
elif score < 60:
    print("F")

其实分支条件还可以简化,因为下一个 elif 判断时注定不满足前一个条件:

Python
score = eval(input("Please input youre score: "))
if score >= 90:
    print("A")
elif score >= 85:
    print("A-")
elif score >= 81:
    print("B+")
elif score >= 78:
    print("B")
elif score >= 76:
    print("B-")
elif score >= 72:
    print("C+")
elif score >= 68:
    print("C")
elif score >= 65:
    print("C-")
elif score >= 63:
    print("D+")
elif score >= 61:
    print("D")
else:
    print("F")

二、循环 while

if 很像,不过每次执行完内部语句后都会回来检查条件是否为真,若为真则再执行一次内部语句,以此循环。

Python
1
2
3
while expression:
    something you want to do
    some other thing you want to do

那么对于上面的程序,就可以补充一个“如果输入不在 0~100 之间则重新要求输入”的功能:

Python
1
2
3
score = eval(input("Please input youre score: "))
while score < 0 or score > 100:
    score = eval(input("Please input youre score: "))

告别繁琐安装界面,使用Scoop管理Windows软件

T11:15:27+08:00 写这篇文章的起因是一位舍友问我怎么配置 Python 环境,我想了想虽然普通的方式也不算复杂环境变量会被安装器自己加上,但是想了想曾经他们配置 Java 环境时的费劲程度,我想起了假期遇见的能让人从这一系列繁琐配置过程中解脱出来的软件 —— Scoop。所以这篇文章将以安装 Python 为引,介绍一下 Scoop 的基本使用。

一、什么是 Scoop

官网:Scoop

Github:ScoopInstaller/Scoop: A command-line installer for Windows. (github.com)

它可以被看作是 Windows 下的 包管理器,而 包管理器 一般是 Linux 系统中的概念。在 Linux 的各种发行版中通常都会包括一个特殊的软件(包管理器),使得可以通过这个软件方便的管理所有其他的包(软件、字体等等)。

下面为了直观感受,举几个例子,在 Ubuntu 下使用 apt-get:

Text Only
apt-get install python

在 Archlinux 下使用 Pacman:

Text Only
pacman -S python

诸如此类。

而说 Scoop 是 Windows 下的包管理器也就不难理解了,其实就像官网的副标题一样,它是一个「用于 Windows 的命令行安装程序」。它会将 GUI 式的安装引导、权限请求窗口隐藏起来,自动安装依赖,同时能够避免 PATH 环境变量污染以及由于安装与卸载导致的意外的副作用。

它的工作方式就是将安装源文件内的所有文件按照仓库中的指定方式配置到你的系统中,默认它会将应用安装到 ~/scoop/(即 C:\Users\<YOURUSERNAME>\scoop

二、安装 Scoop

要学会看官网、看 Github 的 README:

image-20230307100417399

image-20230307100435037

总而言之就是在 PowerShell 中运行下面一行简单的命令:

PowerShell
iwr -useb get.scoop.sh | iex

如果你获得了一坨报错,那是因为 Windows 默认不允许运行远程的未签名的脚本,需要在 设置>隐私和安全性>开发者选项>PowerShell 中将「更改运行策略,以允许……」选项打开。

如果还报错,就是网络问题,毕竟 Github 在国外(),要么多试几次没准玄学就出来了,要么相信你也会科学上网。

三、基本使用

1. 基础的使用

安装完毕后回到正题,怎么安装 Python?很简单,一行命令:

PowerShell
scoop install python

结束。你可以在终端输入 python 就能直接使用。

如果你想更新:

PowerShell
scoop update python

或者使用 scoop update * 来更新所有使用 Scoop 管理的软件

如果你想卸载:

PowerShell
scoop uninstall python

如果你想查看 Scoop 都安装了什么软件:

PowerShell
scoop list

我怎么知道我可以用 Scoop 安装什么软件呢?可以到官网(Scoop)去查:

image-20230307100935495

在这里搜软件的名字。

比如可以查到刚才安装的 Python:

image-20230307101315527

比如我们还想安装 jdk,就搜 jdk。

不过你会发现它有很多很多 jdk,有 corretto-jdkliberica-jdk 甚至还有 microsoft-jdk 等等,而我们以前从官网下载的就是 oraclejdk。他们都是遵循着 Java 的规范做的不同实现,在性能以及选项上会有一定的差异,而且他们的开闭源性也不同,开源的协议也不同。

这里搜索 oraclejdk 为例:

image-20230307101249022

这里又会发现,名字后面的 in xxx 和刚才有区别,刚才是 python in main,现在是 oraclejdk in java,这里就引入 Scoop 中 Bucket 的概念。

2. Bucket

Scoop 将各种软件分门别类的放在了不同的仓库中,每一个仓库就是一个 Bucket。你可以在 ScoopInstaller 的 Github 中看到每个 Buckets 的仓库:

image-20230307101726755

当然在官网你还可以方便地找到一些非官方的 Buckets。

Scoop 默认是只包含 main Bucket 中的内容的,要想使用其他 Bucket 需要将其他的 Bucket 添加进来:

PowerShell
scoop bucket add java

如果你没有安装过 git 他会提示你需要 git,而 git 其实在 main Bucket 中,那你也可以直接使用 Scoop 安装 git:

PowerShell
scoop install git

然后再添加 Bucket。

添加过后就可以安装 oraclejdk 了:

PowerShell
scoop install oraclejdk

现在你不需要管那些繁琐的环境变量配置,直接输入 java -version 就能够使用。

三、装到哪去了?它是怎么搞定环境变量的?

其实到上一步你已经可以使用 Scoop 了,不过后面会继续讲解一些 Scoop 的机制,这样在遇到一些问题是你才会知道怎么解决以及原因是什么。

前面提到 Scoop 会将软件安装到 ~/scoop/(即 C:\Users\<YOURUSERNAME>\scoop),我们可以打开这个目录看看:

image-20230307103948890

  • apps/:存放安装的软件的目录
  • buckets/:存放 Bucket 信息的目录
  • shims/:存放可执行文件的硬链接

如果你到 apps/python/ 里去看一看,它会长下面这样:

image-20230307104241749

刚才安装的 Python 3.11.2 就在 3.11.2/ 这个目录下,那这个长得像快捷方式但又不是快捷方式的 current/ 又是什么?它其实是一个“链接”,指向真正的版本。

如果你查看一下环境变量,会发现里面的 PATH 多了这些:

Text Only
1
2
3
C:\Users\<username>\scoop\apps\python\current\Scripts
C:\Users\<username>\scoop\apps\python\current
C:\Users\<username>\scoop\shims

多了一个 JAVA_HOME

Text Only
C:\Users\<username>\scoop\apps\oraclejdk\current

在正常安装 Java 时即是手动配置 JAVA_HOME 添加安装的目录,在正常安装 Python 时,也是在环境变量中添加安装目录及其下面的 Scripts/ 目录。

而如果你去看一看 scoop/shims/ 目录,里面会有一些可执行文件和 .shims 文件(这些可执行文件其实只是 apps/ 中真正的的文件的链接)。

好像东西有点多?那先缓一缓。


这里给出了一个更新 Pandoc 时的输出:

Text Only
Updating 'pandoc' (3.1 -> 3.1.1)
Downloading new version
pandoc-3.1.1-windows-x86_64.zip (25.1 MB) [================================================================] 100%
Checking hash of pandoc-3.1.1-windows-x86_64.zip ... ok.
Uninstalling 'pandoc' (3.1)
Removing shim 'pandoc.shim'.
Removing shim 'pandoc.exe'.
Unlinking ~\scoop\apps\pandoc\current
Installing 'pandoc' (3.1.1) [64bit] from main bucket
Loading pandoc-3.1.1-windows-x86_64.zip from cache
Extracting pandoc-3.1.1-windows-x86_64.zip ... done.
Linking ~\scoop\apps\pandoc\current => ~\scoop\apps\pandoc\3.1.1
Creating shim for 'pandoc'.
'pandoc' (3.1.1) was installed successfully!

在更新 Pandoc 时,它首先获取了新的版本。

卸载旧的版本时,移除了 shims/ 中的两个文件,并取消了 current/ 的链接。

然后安装新的版本,重新创建 shims/ 中的链接,并重新将 current/ 链接到新的版本。

现在,是不是清楚了?


Scoop 在环境变量中添加的并不是真正的安装的目录以及文件,因为如果一旦目录进行更改,环境变量就要重新修改。它添加的是一个个“链接”的存在。

在更新新的版本时,只需要把链接重新指向新的文件即可,不必再次修改环境变量。而且对于每个软件都如此管理。

四、管理员权限请求的窗口?

Scoop 安装的位置是在 用户 目录 C:/Users/<username>/ 中的 scoop/ 目录下,而非位于系统目录 C:\Program Files,因此不需要管理员权限。

也因此,使用 Scoop 能够良好管理的软件有一定的局限性,比如他们一般是 Portable 的。

不过它也能够在系统层面安装一些东西,比如我的安装系统的脚本中一口气安装我所需要的字体的部分:

PowerShell
scoop install sudo
sudo scoop install -g SarasaGothic-SC JetBrainsMono-NF-Mono LXGW-Bright # nerd-fonts

使用 sudo 会弹出请求窗口并获取权限,使用 -g 来安装在全局而非用户。

五、终极奥义

于是,可以写一个脚本,来在重装完系统后一口气安装所有所需的包。

比如我还使用了 choco 与 scoop 搭配使用,完整见我的 gist:

『Git』0. 概述

T21:46:00+08:00 什么是 git?是一款免费、开源、分布式 版本控制系统。那么版本管理系统又是什么?

一、什么是版本管理

版本管理系统Version Control System or VCS)即记录一个或一组文件随着时间的推移所发生的变化,以便你以后可以找回特定的版本。日常计算机使用中对一个文件的最常见最简单的的版本管理就是 撤销/重做 系统,然而版本管理并不局限于单个文件以及文件的类型,它完全可以扩展到对一个目录内所有内容的管理。

一个被用于版本管理的最关键的工具就是 修订管理系统Revision Control System or RCS),它的工作原理是在每一次文件更新时记录文件不同版本之间的差异(也叫做补丁集),并将其以一种特殊的格式保存在磁盘上;然后它可以通过将所有的补丁相加来重新创建任何文件在任何时间点的样子。

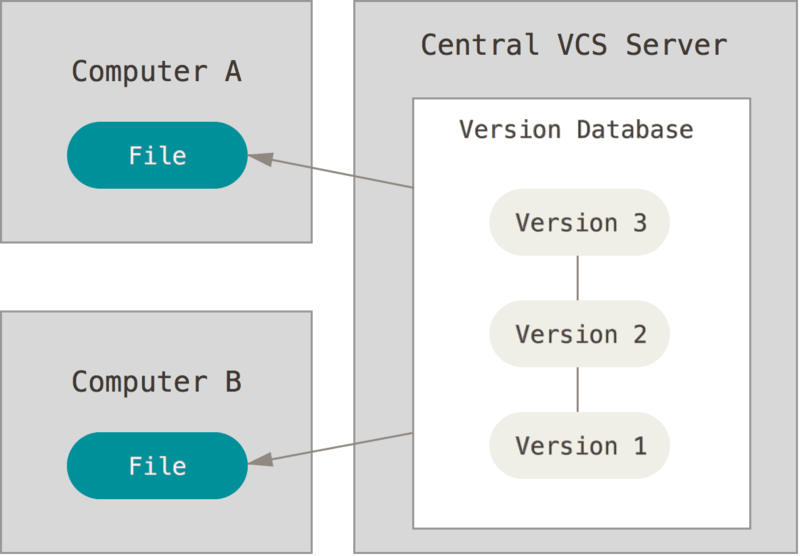
1. 中心化 VCS

Pasted image 20221130204212

也就是将版本文件存储在一个中央服务器上,所有其他人从这个服务器中获取最新版本的文件,修改后再传回服务器。 然而这有一些坏处,如果服务器寄了,那就寄了。在本地管理也是如此,硬盘寄了,那就寄了。

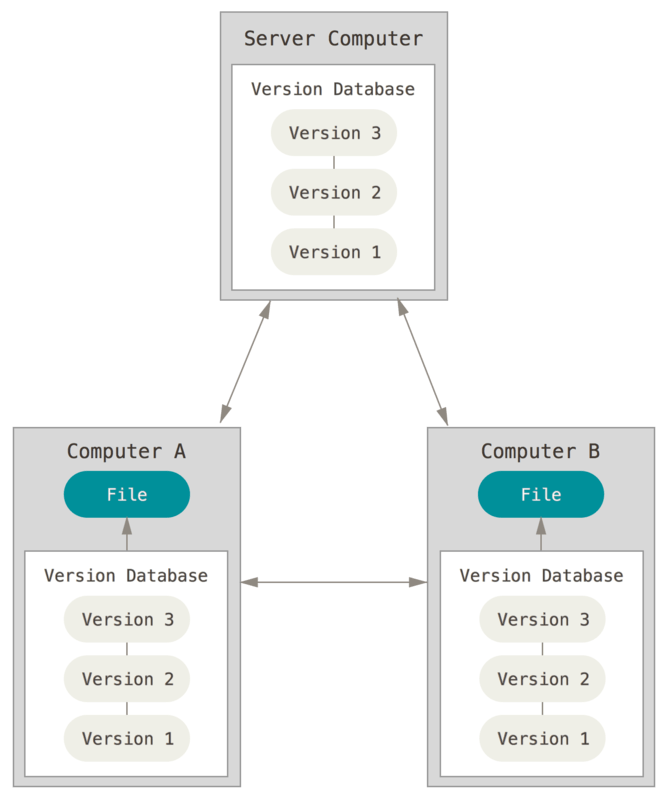
2. 分布式 VCS

Pasted image 20221130204218

各个客户不再只是检查文件的最新快照;相反,他们将所有版本信息,包括其完整的历史,完全保存。因此,如果有任何服务器寄了,任何一个客户端的仓库都可以被复制到服务器上,以恢复它。每个克隆实际上是所有数据的完整备份。

而 git,就是一个分布式的版本管理系统。

二、什么是 git

Git 与其他版本管理系统相比,存储和思考信息的方式非常不同,因此如果你理解了什么是 Git 以及它如何工作的基本原理,那么有效地使用 Git 对你来说可能就会容易得多。

Git 存储快照 而非差异

首先,Git 与其他任何 VCS(CVS、Subversion、Perforce、Bazaar等等)的主要区别在于 Git 对其数据的思考方式。

git并不记录随着时间推移产生的不同文件版本之间的差异,而是记录一个完整的文件快照。每次提交或保存项目状态时,Git 基本上都会拍下所有文件在那一刻的样子,并存储对该快照的引用。为了提高效率,如果文件没有变化,Git不会再次存储该文件,而只是存储一个与之前相同的文件的链接。

『Git』1. 仓库

T21:47:00+08:00 本节内容:

  • git init 初始化空仓库
  • git clone 从远端克隆下来一个仓库

仓库 是受 git 管理的项目根目录及其内部的所有内容,它包含被管理的文件以及一个 .git 目录(其中存放着 git 用于管理版本而产生的数据文件)。

通常获取 Git 仓库有两种方式: 1. 将尚未进行版本控制的本地目录转换为 Git 仓库 2. 从其它服务器 克隆 一个已存在的 Git 仓库。

一、在尚未进行版本控制的目录中初始化仓库

比如我们有这样一个目录:

Text Only
1
2
3
 my_project/
 |- main.cpp
 |- main.exe

首先,你需要进入到想要管理的项目根目录中,然后执行初始化命令:

Bash
cd my_project/
git init

执行完毕后,你将看到多了一个名为 .git 的子目录,这个子目录含有你初始化的 Git 仓库中所有的必须文件,这些文件是 Git 仓库的骨干,不过通常你不必管它。

Diff
1
2
3
4
 my_project/
+|- .git/
 |- main.cpp
 |- main.exe

如果你所在的目录中已经存在一些文件,初始化仓库并不会自动让他们被 Git 跟踪,你还需要 [向 git 中添加文件]。

Bash
git add *
git commit -m "initial commit"

二、克隆现有的仓库

克隆仓库的命令是 git clone <url> 。 比如,要克隆 Git 的链接库 libgit2,可以用下面的命令:

Bash
$ git clone https://github.com/libgit2/libgit2

这会在当前目录下创建一个名为 “libgit2” 的目录,并在这个目录下初始化一个 .git 文件夹, 从远程仓库拉取下所有数据放入 .git 文件夹,然后从中读取最新版本的文件的拷贝放在目录下。

当然你也可以指定存储的目录名:

Bash
$ git clone https://github.com/libgit2/libgit2 mylibgit

『Git』2. 记录更新

T21:48:00+08:00 本节内容:

  • git status 查看仓库状态
  • git add 开始跟踪文件
  • git add 暂存文件
  • git rm 移除文件(取消跟踪)
  • git commit 提交更新
  • git log 显示所有的提交日志

一、Git 中的工作流程

首先,在 Git 仓库中,任何文件都不外乎这两种状态:

  • 已跟踪:被纳入了版本管理,在上一次快照中有它们的记录

    对于这类文件有三种状态:已提交、已修改、已暂存

    • 已提交:文件当前版本的快照已被保存

    • 已修改:修改了文件,但没有被保存

    • 已暂存:标记了文件的当前版本做了标记,会使之包含在下次提交的快照中

  • 未跟踪:没有被纳入版本管理

对应着这些文件被存储在不同的地方:

  • 工作区:也就是展现在外面的文件,这里是对项目的某个版本独立提取出来的内容,供你使用或更改。

  • 暂存区.git/ 目录中的一个文件,保存了下次将要提交的文件列表信息。

  • .git 目录:Git 用来保存项目的元数据和对象数据库的地方。

基本的 Git 工作流程如下: 1. 在工作区中修改文件。 2. 将你想要下次提交的更改选择性地暂存,这样只会将更改的部分添加到暂存区。 3. 提交更新,找到暂存区的文件,将快照永久性存储到 Git 目录。

二、跟踪文件

还是上一个例子,比如有这样一个目录:

Diff
1
2
3
 my_project/
 |- main.cpp
 |- main.exe

我们来对仓库进行初始化:

Bash
git init
Diff
1
2
3
4
 my_project/
+|- .git/
 |- main.cpp
 |- main.exe

此时,我们可以通过下面的命令来查看当前仓库的状态:

Bash
git status

其输出如下:

Text Only
On branch master

No commits yet

Untracked files:
  (use "git add <file>..." to include in what will be committed)
        main.cpp
        main.exe

nothing added to commit but untracked files present (use "git add" to track)

它告诉我们 main.cppmain.exe 没有被跟踪,要想跟踪一个文件,要执行如下命令:

Bash
git add main.cpp main.exe

[!tip] 当然它支持通配符,所以也可以这么写来添加所有文件名为 main 后缀不限的文件:git add main.*,也可以这样子添加所有文件:git add * 当然也可以用 git add .

我们再执行 git status 查看一下仓库状态:

Text Only
1
2
3
4
5
6
7
8
On branch master

No commits yet

Changes to be committed:
  (use "git rm --cached <file>..." to unstage)
        new file:   main.cpp
        new file:   main.exe

现在文件就被跟踪了。

如果我们此时修改一下 main.cpp,再查看状态:

Text Only
On branch master

No commits yet

Changes to be committed:
  (use "git rm --cached <file>..." to unstage)
        new file:   main.cpp
        new file:   main.exe

Changes not staged for commit:
  (use "git add <file>..." to update what will be committed)
  (use "git restore <file>..." to discard changes in working directory)
        modified:   main.cpp

二、暂存与提交文件

暂存的目的是标记有哪些文件需要被提交,如果一个文件是刚被添加到 git 版本管理中的,那么它便是被暂存的。

也就是说刚才我们通过 git addmain.cppmain.exe 跟踪后,他们便是暂存的,你也可以看到在 git status 中也显示他们是 Changes to be committed,而我们又对 main.cpp 做了修改,这时候这个修改便没有被暂存,git status 显示其为 Changes not staged for commit

我们可以先提交一下更改:

Bash
git commit -m "Initial commit"

通过 -m 参数指定提交的信息。

输出:

Text Only
1
2
3
 2 files changed, 8 insertions(+)
 create mode 100644 main.cpp
 create mode 100644 main.exe

再来看看状态:

Text Only
1
2
3
4
5
6
7
On branch master
Changes not staged for commit:
  (use "git add <file>..." to update what will be committed)
  (use "git restore <file>..." to discard changes in working directory)
        modified:   main.cpp

no changes added to commit (use "git add" and/or "git commit -a")

可以看到只有暂存的更改被提交了。

我们来将刚才修改过的 main.cpp 暂存一下,这个命令依旧是 git add

Text Only
git add main.cpp

再来看一下状态:

Text Only
1
2
3
4
On branch master
Changes to be committed:
  (use "git restore --staged <file>..." to unstage)
        modified:   main.cpp

再进行提交,输出:

Text Only
[master e0afb9c] updated main.cpp
 1 file changed, 1 insertion(+), 1 deletion(-)

最终的状态:

Text Only
On branch master
nothing to commit, working tree clean

三、.gitignore文件 以及 文件的移除

有时候我们不希望一些文件被 git管理,比如本例子中的 main.exe 这类的构建文件,它是由源代码文件 main.cpp 编译出来的,因此我们常常不对这类文件进行管理。git 提供了一个方法来忽略一些特定的文件、目录,那就是 .gitignore 文件。

在项目根目录创建一个 .gitignore 文件:

Diff
1
2
3
4
5
 my_project/
 |- .git/
+|- .gitignore
 |- main.cpp
 |- main.exe

在里面写入以下内容:

Text Only
*.exe

这时我们查看状态会显示:

Text Only
1
2
3
4
5
6
On branch master
Untracked files:
  (use "git add <file>..." to include in what will be committed)
        .gitignore

nothing added to commit but untracked files present (use "git add" to track)

我们再重新编译刚才我们修改后的 main.cppmain.exea.exe

Text Only
g++ main.cpp -o main
g++ main.cpp -o a

这时我们再查看状态我们会发现,main.exe 的修改,以及 a.exe 的新增都没有出现:

Text Only
1
2
3
4
5
6
On branch master
Untracked files:
  (use "git add <file>..." to include in what will be committed)
        .gitignore

nothing added to commit but untracked files present (use "git add" to track)

我们对 .gitignore 加入跟踪,并且提交:

Bash
git add .
git commit -m "Added .gitignore"

但是其实,再文件的快照版本中,main.exe 依旧是存在的,只是这一次提交的快照中并没有包括对其的修改,而 a.exe 是不存在的,因为它还没有被跟踪。

从 git 中移除一个文件(取消跟踪的同时也会将其从工作区删除)的方式如下:

Bash
git rm main.exe

[!info] 正常情况下删除了某个文件后的暂存操作也是使用 git rm。 也就是说 git rm 命令的作用是暂存对文件的移除,如果文件存在也会实际的将文件移除。

Diff
1
2
3
4
5
 my_project/
 |- .git/
 |- .gitignore
 |- main.cpp
-|- main.exe

我们再查看状态:

Text Only
1
2
3
4
On branch master
Changes to be committed:
  (use "git restore --staged <file>..." to unstage)
        deleted:    main.exe

这时,main.exe 便被停止跟踪了,同时也被从本地目录删除。

再将其提交:

Bash
git commit -m "Removed main.exe"

到此为止我们做了很多的修改,我们可以通过 git log 来查看所有的提交(最新的提交会在最上面):

Text Only
commit 901aff72d7be178eb8626096bbab2a1cacb6ede6 (HEAD -> master)
Author: Azur冰弦 <973562770@qq.com>
Date:   Thu Dec 1 18:17:39 2022 +0800

    Removed main.exe

commit bff6c0e2f04628b372c715f6a04f07b34752a47f
Author: Azur冰弦 <973562770@qq.com>
Date:   Thu Dec 1 18:12:47 2022 +0800

    Added .gitignore

commit e0afb9cb05b556c0934ff059ea1aa234bac8e620
Author: Azur冰弦 <973562770@qq.com>
Date:   Thu Dec 1 10:13:45 2022 +0800

    updated main.cpp

commit 34ef417c28ab016015d36f70ceafc6cb9ad4f9a3
Author: Azur冰弦 <973562770@qq.com>
Date:   Thu Dec 1 10:12:27 2022 +0800

    Initial commit

PostgreSQL安装

T13:53:00+08:00

官网:PostgreSQL: The world's most advanced open source database

相关信息:

PostgreSQL 与 MySQL 相比,优势何在? - 知乎 (zhihu.com)

一、下载

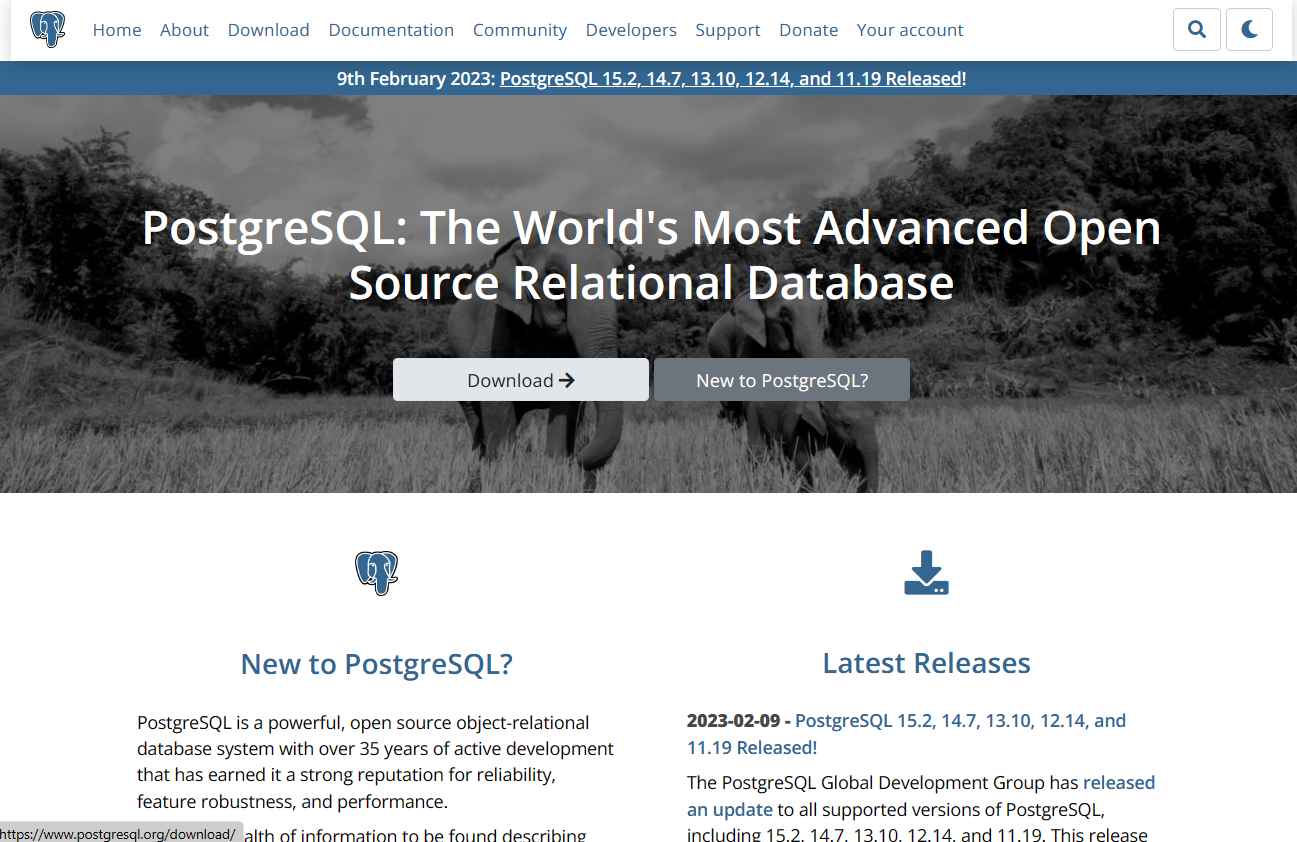
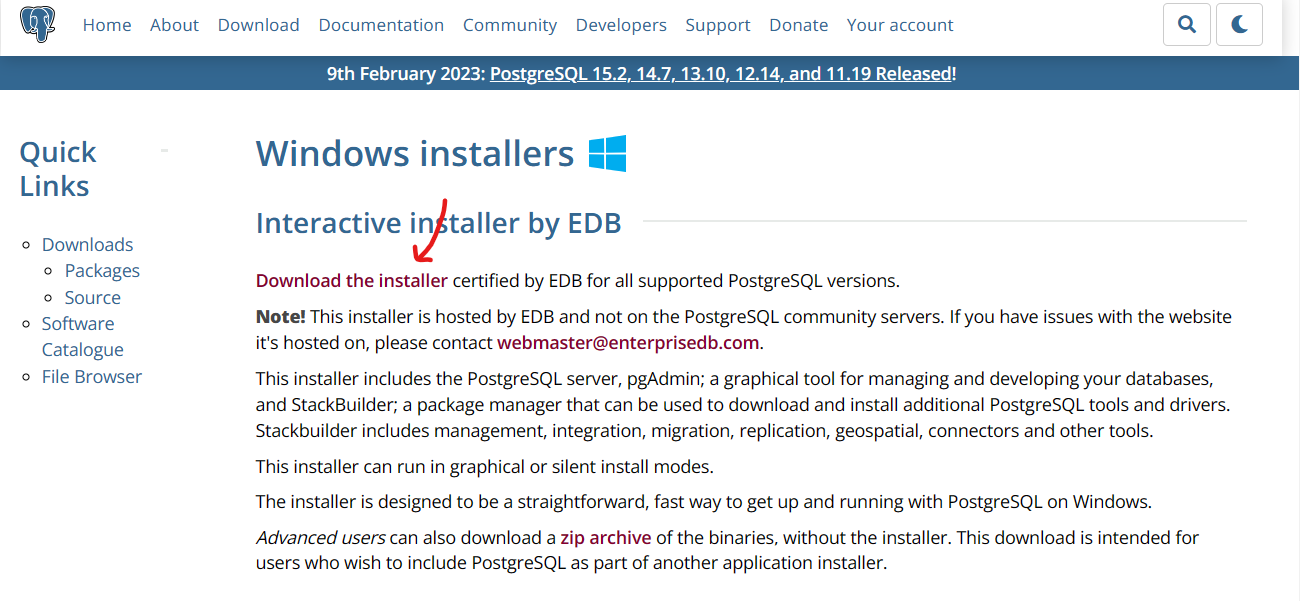
image-20230304124236042

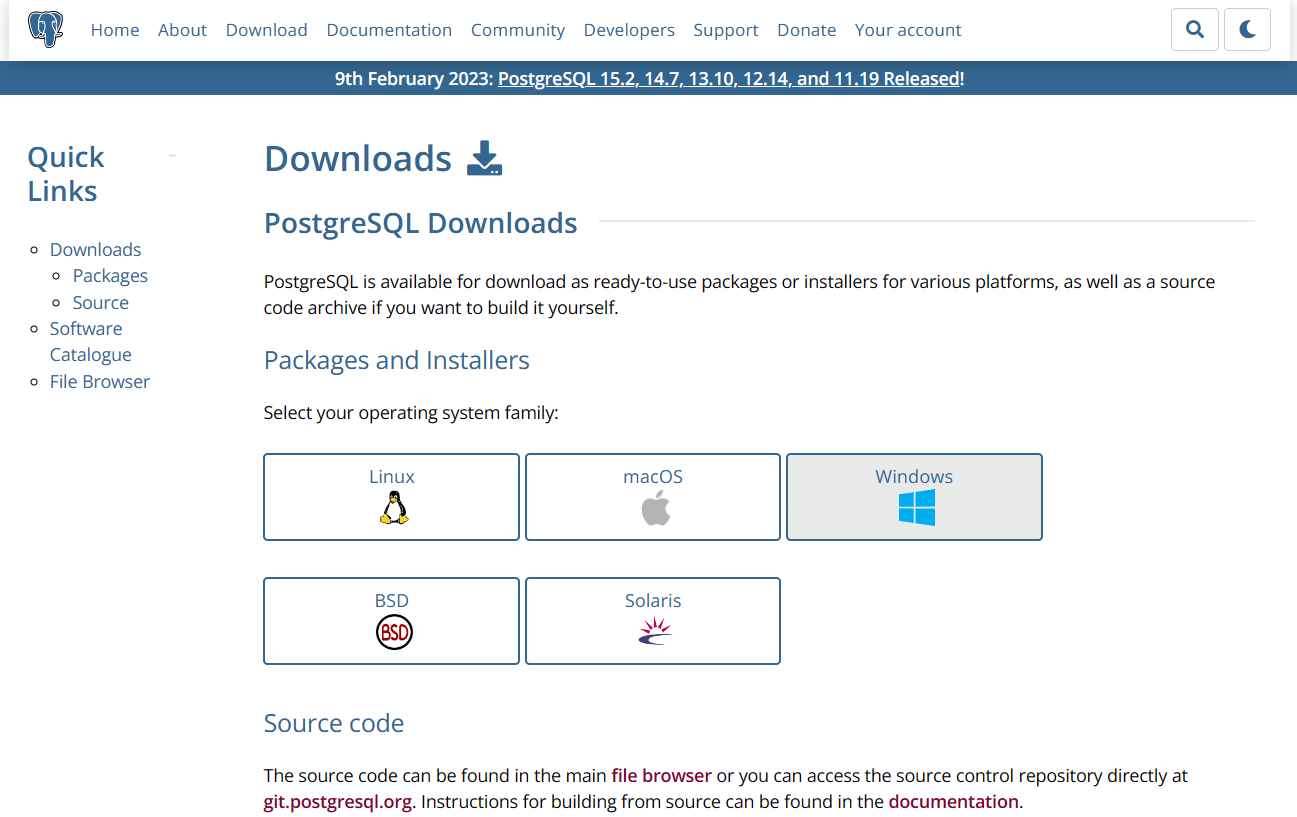
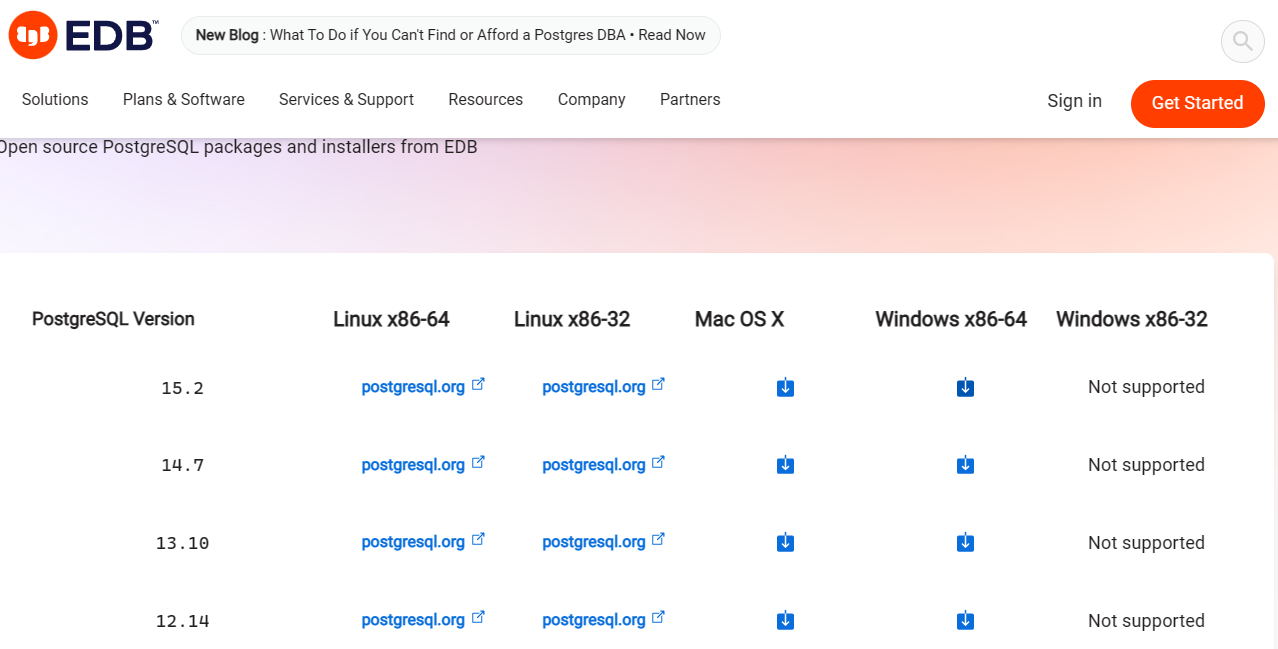
进入 Download 页面,选择你的系统:

image-20230304124310575

image-20230304124403375

image-20230304124451709

二、安装

一路下一步。

配置访问数据库需要的密码:

image-20230304124824302

配置访问数据库使用的端口(一般不用改):

image-20230304124834259

然后继续一路下一步,最后不用选择在退出时打开 Stack Builder。

Golang 接口

T10:24:39+08:00 在 go1.18 以前,接口的定义是 方法的集合。 而在 go1.18 及之后,其定义就变更为了 类型的集合

一、基础接口 与 嵌套接口(go1.18 前)

这部分其实就是 go1.18 前接口的样子,每一个接口规定了一个方法的集合,只要一个类型的方法集是接口类型所规定的方法集的超集,就视其实现了方法。

1.1 基础接口

比如对于这一个接口,其规定了一个包含 ReadWriteClose 的方法集,那么只要一个类型的方法集中包含这三个方法就视其实现了这个接口:

Go
1
2
3
4
5
6
// A simple File interface.
type File interface {
    Read([]byte) (int, error)
    Write([]byte) (int, error)
    Close() error
}

1.2 嵌套接口

嵌套接口,其实就是对「要求」进行交集的操作,比如对于下面的 ReadWriter 接口,它要求实现它的类型即满足 Reader 又 满足 Writer,也就是说当一个类型的方法集中包含 ReadWriteClose 这三个方法才说它实现了这个接口。

Go
type Reader interface {
    Read(p []byte) (n int, err error)
    Close() error
}

type Writer interface {
    Write(p []byte) (n int, err error)
    Close() error
}

// ReadWriter's methods are Read, Write, and Close.
type ReadWriter interface {
    Reader  // includes methods of Reader in ReadWriter's method set
    Writer  // includes methods of Writer in ReadWriter's method set
}

这里提到的「要求」其实就是所谓的「类型集」的概念,一个要求可以确定出对应的一系列满足要求的类型,在 go1.18 及之后,接口的功能被进行了拓展,可以将这个「要求」不局限于方法的要求,进一步可以规定类型的要求。 或者换句话说,原本的方法集其实也是规定了一个个类型集,在 go1.18 及之后使其更加通用了。

二、通用接口(go1.18 及之后)

首先,上面的 ReadWriter 其实就是 Reader 所表示的类型集和 Writer 所表示的类型集的交集,当一个接口中包含多个非空类型集的时候,它所表示的类型集就是他们的交集:

Go
1
2
3
4
5
// ReadWriter's methods are Read, Write, and Close.
type ReadWriter interface {
    Reader  // includes methods of Reader in ReadWriter's method set
    Writer  // includes methods of Writer in ReadWriter's method set
}

相应的也可以表示并集(其实这里就是泛型的类型约束),比如这样一个接口,就表示是 float32float64 的类型的集合:

Go
1
2
3
type Float interface {
    float32 | float64
}

三、再看一看官方文档的定义

go1.18 前:

Interface types An interface type specifies a method set called its interface. A variable of interface type can store a value of any type with a method set that is any superset of the interface. Such a type is said to implement the interface.The value of an uninitialized variable of interface type is nil.

一个接口类型定义一个 方法集。 一个属于某一个接口类型的变量能够存储任何类型的值,而它的方法集要求是接口的方法集的超集。

其实就是讲一个类型的方法集包含接口中的所有方法时,就称其实现了接口。

go1.18 及之后:

Interface types An interface type defines a type set. A variable of interface type can store a value of any type that is in the type set of the interface. Such a type is said to implement the interface.The value of an uninitialized variable of interface type is nil.

一个接口类型定义一个 类型集。 一个属于某一个接口类型的变量能够存储属于这个接口所规定的类型集中的任意类型的值。

第二句话可能有点绕,不过绕绕也能绕出来,这里为了绕一绕所以翻译得原汁原味一些,其实表达的就是实现接口的意思,对应着下面的实现接口的定义:

Implementing an interface A type T implements an interface I if

  • T is not an interface and is an element of the type set of I; or
  • T is an interface and the type set of T is a subset of the type set of I.

A value of type T implements an interface if T implements the interface.

对于一个类型 T 来说,有两种情况我们称其实现了接口 I: - T 本身不是个接口类型,但是其属于 I 所定义的类型集。 - T 是一个接口,且 T 所规定的类型集是 I 所定义的类型集的子集。

而对于一个 T 类型的值来说,它的类型 T 实现了接口,就称它实现了接口。